Description
In order to better understand how to design a building, we needed to know about the layers of the earth and the angles of the sun. Before working one the new STEM building, we did a small day-lighting project and took notes about the earth's layers. There was also an orbit of the planets model that we did as well, and as an additional bonus, we also took notes on the atomic structures, subatomic particles, which will be shared further down the this page. All of these things will be presented on the page before the main project.

Main Project Description
Our main goal by the end of this unit was to create a plan for a new STEM building. This building is suppose to follow the guide lines such as under 18,000 square feet, 10 classroom, use as little electricity as possible by allowing as much natural light in as possible, and being a bit unique. We had to be specific with how we wanted the building to look like one the outside and the inside. Our group chose to represent our building with a blueprint of the floor plan and a 3D model that was constructed out of cardboard. As you will see later on this page we have a slideshow that has more information about the specifics of our building.
Layers of the Earth (aka. Earth-chan)
Crust- The Earth's thinnest layer, it is solid and rocky. This is where the things I can humans "live."
Mantle- Another layer of this so called "Earth" that is extremely heated rock at the point of liquid and is the largest of the "Earth's" layers. Moho Discontinuity- A layer between the mantle and the crust of Earth-chan. Outer Core- Part of Earth-chan's core that is extremely hot and liquid. Inner Core- The core of Earth-can that is also extremely heated and solid. 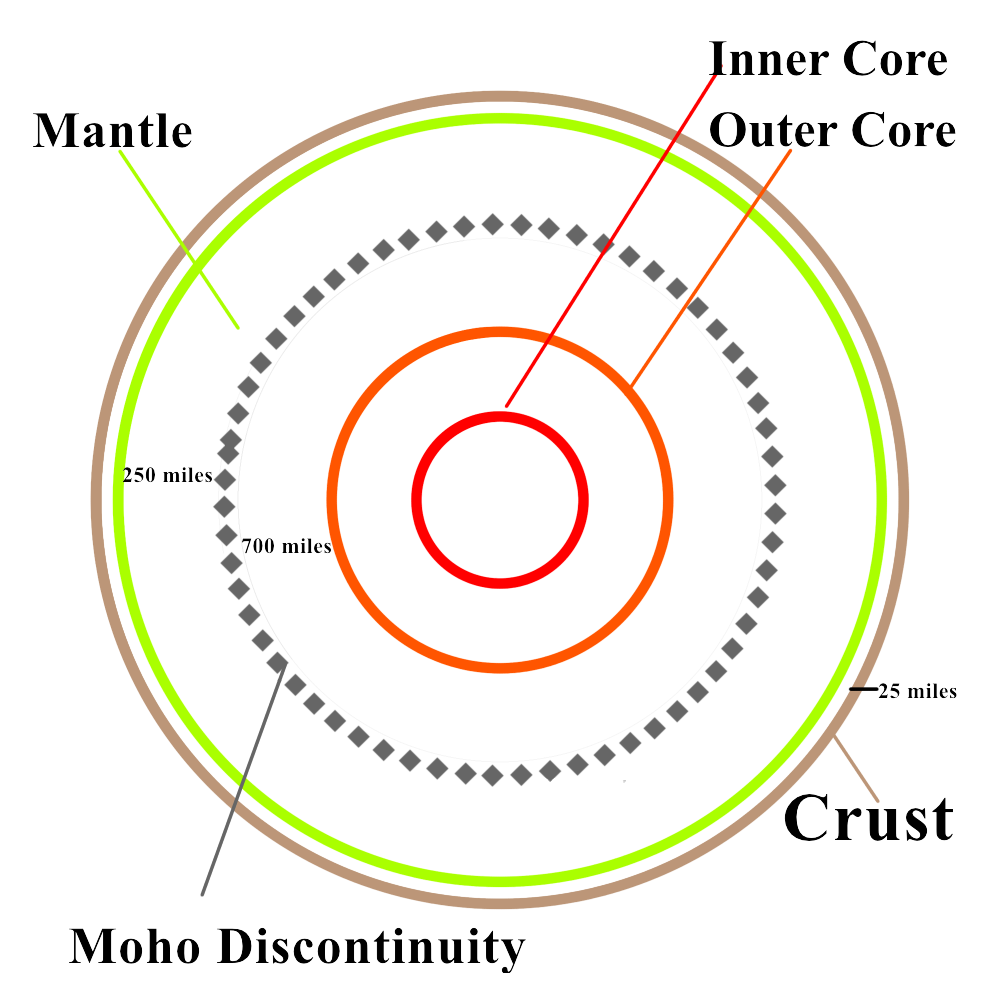
|
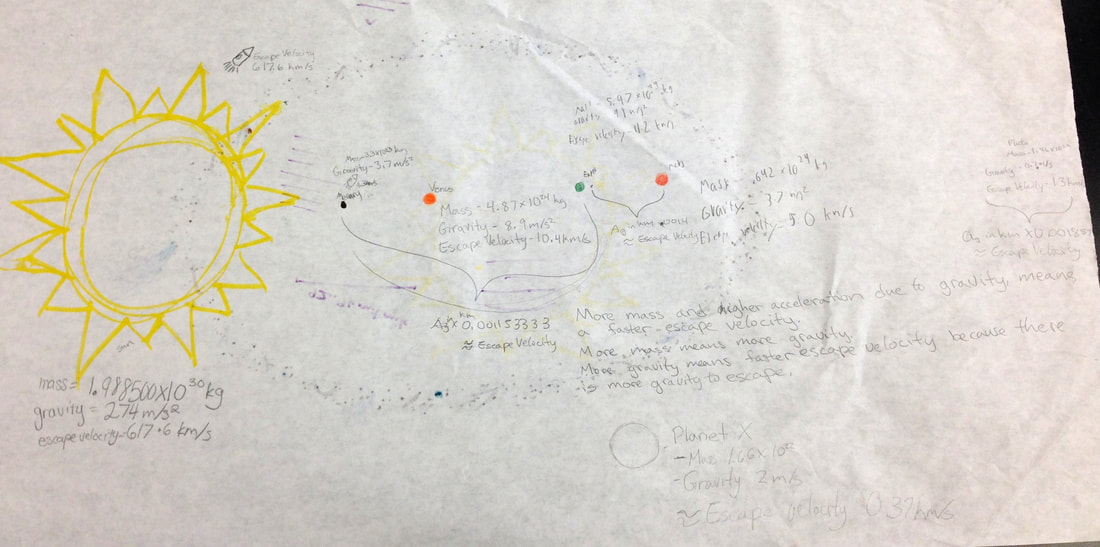
Planet Models This is our first model of the planets.

This is our second model, in this we tried to find a connection between the mass and acceleration due to gravity to the escape velocity of the planet. We did this by comparing these from other planets, and was given a few pieces about a planet "X" and tried to find its escape velocity.
|
Day-Lighting Project
|
To better understand the angles of the sun and how to use them to allow as much natural sunlight as we could into our building, we did this small project. Our assignment for this project was to design and construct a house with a several day-lighting techniques, we then turned the lights off and tested how much light would shine inside the building at different times of day. The only major requirement for this house was to be at most, 1000 square feet. On the right you will see pictures of the house and a general view of our windows and various day-lighting techniques.
This project helped us learn how windows and skylights let the sun in during different times of the day. When designing our STEM building we were able to look back at this project as reference to figure our where to put our windows and type or size they should be. To even test how the windows let light in we held a flashlight, while the lights in the room were off, at different angles to act as our sun at different solar angles. Knowing about solar angles was also very useful knowledge which will be explained right below. |
|
Solar Angles
As Earth rotates, the light from the sun shines onto the surface at different angles, these angles depend on your location and the season of the year. To better simplify how solar angles work, if you were to take a flash light and shine it directly on a paper at a 90⁰ it would be as bright and as circular as possible. However, if the angle was at 45⁰ the light would become dimmer, in addition the circle of light would become and oval; the oval would have the same width and different length. When the angle of the source of light is further from a 90⁰, which can also be considered direct, it becomes more dim and it lengths while keeping its original width. Now on the bigger scale, flashlight as the Sun, and paper as Earth, in the morning the Sun does not hit our area directly, meaning that it is coming from a smaller angle. This is the reason for dim lighting during the morning and the later evenings, meaning we wanted to take in more light during these times of day. In the winter afternoons, the Sun is also at a smaller angle due to the tilt of the Earth. During this time we also want to take in more sunlight not only to light up our building, but to also heat it up because of the cold weather. However, in the summer it is much closer to direct sunlight, which we do not want too much of because it'd be much too bright and heat the building too much. In addition, the fact that the Sun raises from the east and sets in the west, depending where you want there to be more light, we had to decide how we would orientate the building. Knowing about solar angles and how they work truly helped with figuring out where to place our windows and what kinds of and sizes to use in different areas of the building.
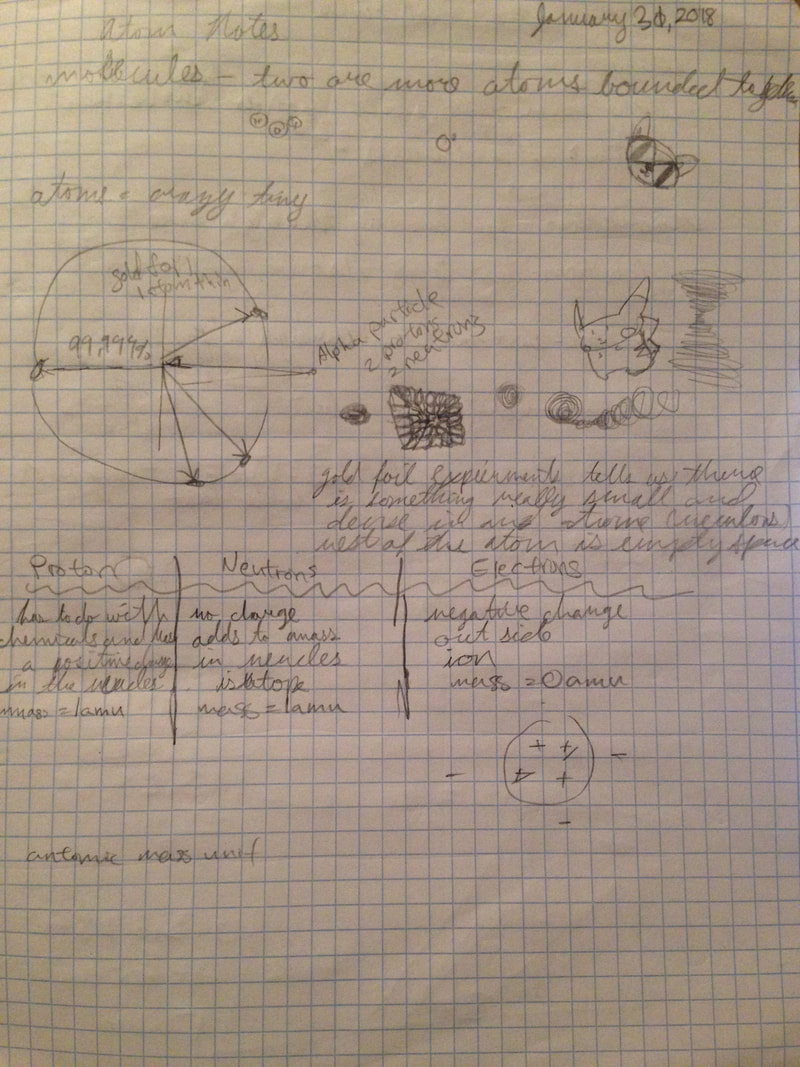
And Now for a Little Bonus About Atomic Structure
|
Molecules- two or more atoms bounded together
Atom- crazy tiny 
|
Justification of Energy
New STEM Building Presentation
Everything that you need to know about the building is in the slides, and clarifying points are right below that was thought to need clarification.

Blueprint Floor Plan- The general floor plan of both floors are the same minus the stair case that will only be placed on the first floor, and the second floor will not on an additional stair case; there is also a balcony surrounding most of the second floor as well. You may notice that some of the classrooms are labeled with the same letters, that means that those classrooms are the same sizes just in a different place.
Blueprint Roof Plan- Our roof is a dome like shape made of various triangles and rectangles, the building materials is glass or plexiglass, and metal for support. This way we can take in a lot of natural light from the sun.
3D Model- As you can see we have a model of the building that was made out of card board and to scale. In the second slide of pictures of the model, you see that there is a piece resting onto of the model. That represents the floor of the second floor, the black line is where the building of the second floor is placed, and the outside of that is the balcony. Though it is difficult to see from the picture, but the piece only overhangs the back of the building and does not cover up the front of it, the way we imagine the building to be placed the back is the side where the sun shines the most during the afternoon.This way we take in less direct light in the afternoon and more in the mornings.
Room Sizes- The letters correspond with the letters on the previous blueprint that was first shown. The number for balcony is the square footage of the entire second floor not just the balcony.
Area of Floor Plan- This is the area of just the first floor, the part of the building that is on the ground.
Reflection

During this project I was able to improve on my personal productivity skills and blueprinting skills but could still work on connecting with my peers more and more aware of what was going on with my other teammates. I also wish I was more linked with reality because some of my ideas were a bit out there. As a group I felt a bit disjointed however we did stay on task and worked fairly efficiently. Personally I felt when I was doing calculations and working I was much more focused and things went more smoothly. This was kind of a big blueprint that took a lot of effort to do and make to scale, which is why it was a good learning experience as well. As a group we did different jobs as a group but I felt a bit too separate, like how I had no idea about any of the building materials until the end portion of this project. I hope that next project I am able to link with my peers more and get to know them a bit better. However we got work done in a good amount of time by splitting the jobs between us and the presentation went smoothly as well. Though it is nice to use imagination I felt that I should have taken reality into more consideration when making a octagon shape because there was a lot of interesting calculations that could have been simplified. Next time I'll weigh coolness of an idea and probability a bit more.
