Watch it Work
Blueprint of the Machine
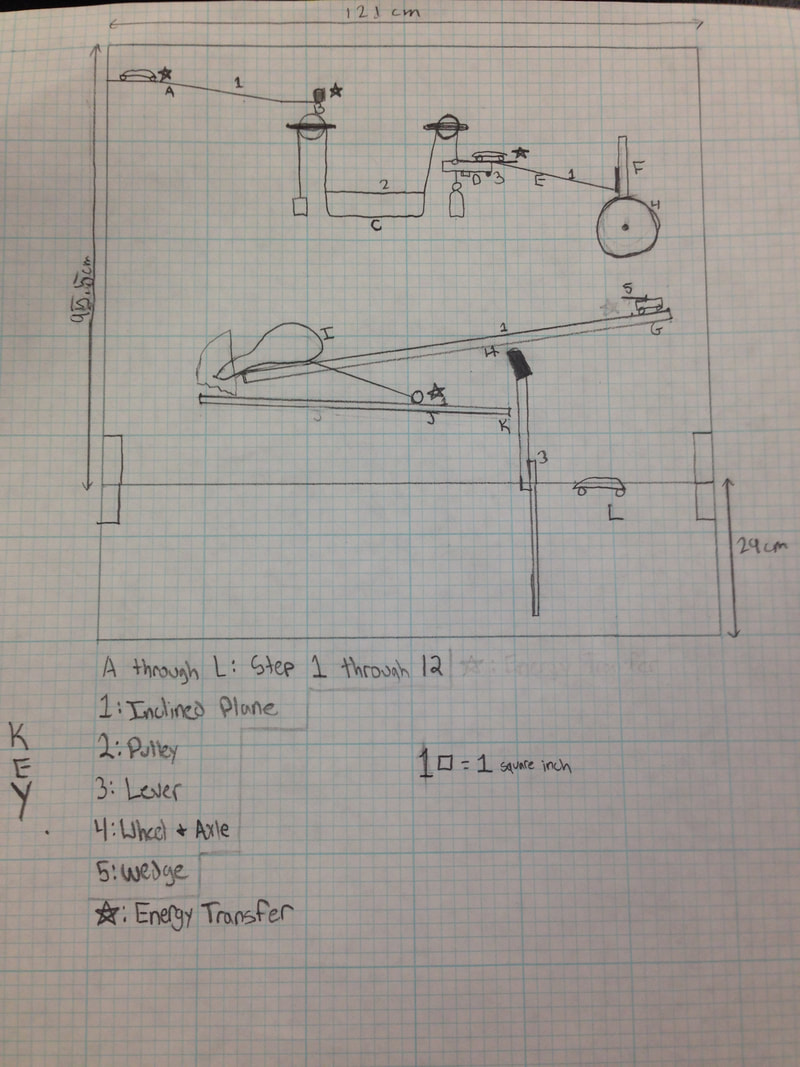
The 12 Steps of the Machine
|
Terms Used The steps to the left may have terms that may seem unfamiliar, for anything you need clarification you can look below for what they mean. Some of these terms you will need to look at multiple to see how they connect and are used as a whole.
Time (t) - Time is measured in seconds (s) We use this concept when calculating velocity because to find it you must do distance divided by time. Distance (d) - How far something has gone/ traveled. The unit of measure is meters (m) We have distance when we measure the length of the ramps. Velocity (v) - The rate of covered distance in a direction. The unit for velocity is m/s, m is for meters, and s is for seconds. We measured the velocity of the mass falling in step 2, which was 0.9 m/s. Acceleration due to Gravity (ag) - The rate of change of velocity due to gravity, acceleration due to gravity is 9.8 m/s^2. The m is for meter, the s is for seconds, and ^2 means it is put to the power of 2, or in other word, squared. We used acceleration due to gravity when finding the potential energy of the first car. Mass (m) - The amount of matter in an object, and the unit for measure is kilograms (kg). To find the mass in an object, we used a triple- beam- balance. You can see an example of mass in the first step where we said what the mass of the car was. Force (F) - The push or pull of an object, and the unit for force is Newtons (N). To find the force, you use the equation F = ma, m is for mass, and a is for acceleration. We measured the force of the wheel and axle step 6 using the equation. Potential Energy (PE) - Energy an object has due to its position at a height or in a gravitational field. The equation for potential energy is PE = mgh, m is for mass, g is for the acceleration due to gravity, and h is for the height in meters. An example of potential energy was in step 7 when we showed how much potential energy the car had. Kinetic Energy (KE) - Energy due to motion, or the energy while the object is in motion. The equation for kinetic energy is KE = mv^2/2, m for mass, v or velocity, and ^2 means to square. Step 10 had an example of kinetic energy when the mass was rolling. Ideal Mechanical Advantage (MA ideal) - This is the mechanical advantage is the mechanical advantage of the machine if fiction did not exist. To find the ideal mechanical advantage , you use the question MA ideal = distance effort/ distance load. The distance effort is distance you cover, an example is the length of a ramp because that is the distance you cover. Distance load is the distance you are trying to cover, an example is the height of a ramp because that is the distance or height you are trying to complete. Ideal mechanical advantage was measured for the ramp in step 1. |
About this Project
A Rube Goldberg machine is a machine to complete a simple task using complex methods. Our assignment was to create one of these machines in our groups. The simple task that we were trying to accomplish was to hit a toy car with a hammer. To accomplish this goal we had 12 steps that are listed above with the physics of each step. We had also chose to have the theme of the project to be Cars themed like the movie. The requirements for the project was to have at least 10 steps of the machine, 5 different simple machines, a theme, 3 principals of design, and a blueprint. We had to present this project on October 3, 2017. For this presentation we had a slide show to help show our project to those watching. The presentation is displayed below if you scroll down. We had 9 days to work on the construction of this machine. Using wood, screws, glue, and other materials we were able to construct the machine. Most of the materials used were from the classroom and had been previously used by students from the past to recycle and reuse the supplies we have. Over these 9 days of construction, my team all worked together to complete the construction in time. To see the process of our construction you can scroll and little down to see our construction log.
Construction Log
|
Day 1
We took two piece of wood and screwed them together to make a platform. The top piece acted as the platform and the bottom piece as support for the platform. Support pieces are the pieces that are actually screwed or attached to the main board standing up, the main pieces are usually not drilled into to make sure we do not split the piece we truly need. We used the same technique for the ramp, a top piece for the ramp and a bottom piece as support. Two triangles, that each had a angle that was about 90 degrees, were screwed into the upright piece of wood and the bottom piece so our machine could stand up. Day 2 A second platform was made by screwing a piece of wood to act as the platform, to a piece of wood to act as the support that would be the piece directly attached to the upright piece of wood. The first pulley was nailed into the board using long nails so the pulley would be able to come off the board. We could not complete the pulley system because we do not have the container that would be in between the two pulleys, meaning we could not determine how far the second pulley had to be from the first. A border made of popsicle sticks for the first ramp that was made on Day 1. The border was made by hot gluing the sticks to the side of the ramp and gluing them on top of each other to make the ramp higher. Day 3 Since we have obtained a container, we were able to attach the second pulley to the board. String was attached to the container on both sides and strung one string to one pulley and strung the string on the opposite side to the second pulley. After adding object to the ends of each string to act as weights, we had finally completed our double pulley system. The lever for our next step was created by using a small wood pole as a fulcrum and put a piece of wood one top, we then screwed a piece of wood beneath the lever to keep it from moving in the wrong direction. To create a smooth transition from the lever, we glued popsicle sticks, half on the piece of wood and half off, this creates a path for a car to roll down when it needs to. Day 4 The second ramp was made with one piece acting as the ramp, and two more pieces for support it and to be screwed into the board directly. This ramp was put under the lever to complete the transition from the lever to the ramp. We created a wheel and axle as our next step. A wood pole was used as our axle, behind the board we put pieces of wood to where the pole stuck out to make sure the pole did not move. Two CD’s acted as our wheel to turn around the axle. Between the two wheels, we screwed a small wooden pole that sticked out of the wheel to hit a car in our machine. The way we attached the stick to the CD’s, was by drilling small pilot holes into the CD’s and stick, then using very small screws we screwed them together. To complete the wheel and axle we put the pole through the holes of the CD’s. |
Day 4
The second ramp was made with one piece acting as the ramp, and two more pieces for support it and to be screwed into the board directly. This ramp was put under the lever to complete the transition from the lever to the ramp. We created a wheel and axle as our next step. A wood pole was used as our axle, behind the board we put pieces of wood to where the pole stuck out to make sure the pole did not move. Two CD’s acted as our wheel to turn around the axle. Between the two wheels, we screwed a small wooden pole that sticked out of the wheel to hit a car in our machine. The way we attached the stick to the CD’s, was by drilling small pilot holes into the CD’s and stick, then using very small screws we screwed them together. To complete the wheel and axle we put the pole through the holes of the CD’s. Day 5 Today we attached a third ramp to the board, this time we just screwed the piece of directly to the board without any support pieces, because we believed the wood was thicker so it would not split. We glued a popsicle stick to near the top of the ramp to hold a car in place. Not much work could be done this day because we had to see what we were going to do with the amount of height we had left. Day 6 The fourth ramp was attached to the board directly using screws and the placement of the balloon was determined. Now we have to wait until we got the funnel piece to attach the balloon to the board. Day 7 Popsicle sticks were glued to the second ramp to assure that the car rolling down it would not fall off the ramp. A thin piece of wood was nailed to the piece of wood that is sticking out of the 2 CD’s to make sure the car would hit it and activate the wheel and axle. Day 8 A funnel was obtained and we began cutting it to fit the machine. We cut the funnel very slightly to see what size would work best for the machine. The funnel seems to be a good size the way it is now. Day 9 We cut the funnel a little bit to make a place for the balloon to stay in place. There was a piece of wood screwed into the boards to hold the hammer up, and a popsicle stick was glued on this piece of wood to help support the hammer. The fourth ramp was cut shorter to gain more height and length on the right side of our board. Popsicle sticks were glued onto the third and fourth ramps to act as borders, and 1 was glued directly onto the ramp diagonally to guide a car in the correct direction. |
Presentation
Principles of Design
We had the three principles of designs, balance, contrast, and pattern, embedded into our design. Balance was in our machine by having a equal number of ramps on each side of the machine, and had two pulleys in the middle. There was contrast by having bright colors in the important part of the machine to attach the human eyes. We had pattern by using popsicle sticks as borders for the ramps repeatedly to create a pattern of popsicle sticks.
Reflection
The group in this project did well in improvising when finding out something was not going to work, and working together. In the process of this project our team could have done better on two things, multitasking, and using our time for efficiently. When looking at the original blueprint we were able to adapt to changing things and even through out the project. Originally we were suppose to have a marble drop out of the balloon after it popped in step 9, however we had troubles with the marble and was able to quickly change the plan slightly with having the mass start rolling because the balloon popped. The team worked together well when because we would do what was needed and asked of by each other without any backtalk. If one of us asked someone for a screw or a nail we would willingly get it for them with no complain. Although, we could have done better at doing multiple things at the same time. We would usually all be working on the same thing rather than all doing different tasks to complete more in a short amount of time. Time could have been used more efficiently by getting a little bit more focused on the project, because at times we seemed to have gotten a bit off topic.
This project was really fun and I learned a lot from the project, however I feel like I could have done more individually to help the group out more. As in the presentation I do not believe I was facing the audience and was not very smooth when speaking. I learned and was able to improve on calculating things like force and potential energy. It was a great opportunity to use power tools and actually build things which I had never really done before; this was a nice learning experience. Something I had learned was how use drills more properly, like putting pressure to make sure the wood I was screwing into would not move. Another thing I had learned was how difficult it is to build something by building this machine and going through process. How I am still not very good at coming up with things to do to help the group be myself. Meaning I am not able to do anything unless told to directly, if I was able to do this it would have helped with multitasking and the group as a whole. During my presentation I noticed that at times my shoulders were facing the board of the machine rather than the audience I was speaking to, in the future I will try to keep my shoulders facing the audience to make it seem like I am talking to them more. Though I spoke loader than I would usually, I should have practiced what I was going to say to make it flow and sound more smooth. For future presentation I will practice more to make the words con out more smoothly and flow better.
This project was really fun and I learned a lot from the project, however I feel like I could have done more individually to help the group out more. As in the presentation I do not believe I was facing the audience and was not very smooth when speaking. I learned and was able to improve on calculating things like force and potential energy. It was a great opportunity to use power tools and actually build things which I had never really done before; this was a nice learning experience. Something I had learned was how use drills more properly, like putting pressure to make sure the wood I was screwing into would not move. Another thing I had learned was how difficult it is to build something by building this machine and going through process. How I am still not very good at coming up with things to do to help the group be myself. Meaning I am not able to do anything unless told to directly, if I was able to do this it would have helped with multitasking and the group as a whole. During my presentation I noticed that at times my shoulders were facing the board of the machine rather than the audience I was speaking to, in the future I will try to keep my shoulders facing the audience to make it seem like I am talking to them more. Though I spoke loader than I would usually, I should have practiced what I was going to say to make it flow and sound more smooth. For future presentation I will practice more to make the words con out more smoothly and flow better.
